Configuration
Customize the Dataspace Connector to fit your use case.
If you want to set up the Dataspace Connector yourself, follow the instructions below. If you encounter any problems, please have a look at the FAQ.
At first, clone the repository:
git clone https://github.com/International-Data-Spaces-Association/DataspaceConnector.git
The resource folder resources/conf provides three important files that are loaded at application start:
keystore-localhost.p12: The provided keystore, on the one hand, is used as IDS certificate that is loaded by the IDS Messaging Services for requesting a valid Dynamic Attribute Token (DAT) from the Dynamic Attribute Provisioning Service (DAPS). Each message to an IDS participant needs to be signed with a valid DAT. On the other hand, it can be used as SSL certificate for TLS encryption.truststore.p12: The truststore is used by the IDS Messaging Services for any HTTP/S communication. It ensures the connection to trusted addresses.config.json: The configuration is used to set important properties for IDS message handling.
In a Docker or Kubernetes deployment, for a custom setup at least these files have to be set via environment variables. Find more details here and in the docs for Docker and Kubernetes.
Step 1: Connector Properties
When starting the application, the config.json will be scanned for important connector information, e.g. its ID, address, contact information, or proxy settings. Please keep this file up to date to your custom settings. In case you want to use the demo cert, you don’t need to change anything except the proxy settings.
For outgoing requests, the connector needs information about an existing system proxy that needs to be set in the resources/conf/config.json.
"ids:connectorProxy" : [ {
    "@type" : "ids:Proxy",
    "@id" : "https://w3id.org/idsa/autogen/proxy/548dc73a-ccfb-4039-9569-4b8e219b90bc",
    "ids:proxyAuthentication" : {
      "@type" : "ids:BasicAuthentication",
      "@id" : "https://w3id.org/idsa/autogen/basicAuthentication/47e3cd59-d351-4f5b-99fc-561c94bad5e1"
    },
    "ids:proxyURI" : {
      "@id" : "http://host:port"
    },
    "ids:noProxy" : [ {
      "@id" : "https://localhost:8080/"
    }, {
      "@id" : "http://localhost:8080/"
    } ]
  } ]
Check if your system is running behind a proxy. If this is the case, specify the ids:proxyURI and change ids:noProxy if necessary. Otherwise, delete the key ids:connectorProxy and its values.
Note: If you want to connect to a running connector or any other system running at https://, keep in mind that you need to add the keystore to your truststore. Otherwise, the communication will fail. With the provided truststore, the Dataspace Connector accepts its own localhost certificate, public certificates, and any IDS keystore that was provided by the Fraunhofer AISEC.
A full configuration example may look like this:
{
  "@context" : {
    "ids" : "https://w3id.org/idsa/core/",
    "idsc" : "https://w3id.org/idsa/code/"
  },
  "@type" : "ids:ConfigurationModel",
  "@id" : "https://w3id.org/idsa/autogen/configurationModel/7672b568-7878-4f62-8032-5c73de969414",
  "ids:configurationModelLogLevel" : {
    "@id" : "idsc:MINIMAL_LOGGING"
  },
  "ids:connectorDeployMode" : {
    "@id" : "idsc:TEST_DEPLOYMENT"
  },
  "ids:connectorDescription" : {
    "@type" : "ids:BaseConnector",
    "@id" : "https://my.ids.connector.com",
    "ids:publicKey" : {
      "@type" : "ids:PublicKey",
      "@id" : "https://w3id.org/idsa/autogen/publicKey/78eb73a3-3a2a-4626-a0ff-631ab50a00f9",
      "ids:keyType" : {
        "@id" : "idsc:RSA"
      },
      "ids:keyValue" : "[...]"
    },
    "ids:description" : [ {
      "@value" : "IDS Connector with static example resources hosted by the Fraunhofer ISST",
      "@type" : "http://www.w3.org/2001/XMLSchema#string"
    } ],
    "ids:version" : "6.0.0",
    "ids:hasDefaultEndpoint" : {
      "@type" : "ids:ConnectorEndpoint",
      "@id" : "https://w3id.org/idsa/autogen/connectorEndpoint/e5e2ab04-633a-44b9-87d9-a097ae6da3cf",
      "ids:accessURL" : {
        "@id" : "https://my.ids.connector.com/api/ids/data"
      }
    },
    "ids:outboundModelVersion" : "4.0.4",
    "ids:inboundModelVersion" : [ "4.0.0", "4.0.4" ],
    "ids:title" : [ {
      "@value" : "Dataspace Connector",
      "@type" : "http://www.w3.org/2001/XMLSchema#string"
    } ],
    "ids:securityProfile" : {
      "@id" : "idsc:BASE_SECURITY_PROFILE"
    },
    "ids:curator" : {
      "@id" : "https://www.isst.fraunhofer.de/"
    },
    "ids:maintainer" : {
      "@id" : "https://www.isst.fraunhofer.de/"
    }
  },
  "ids:trustStore" : {
    "@id" : "file:///conf/truststore.p12"
  },
  "ids:connectorStatus" : {
    "@id" : "idsc:CONNECTOR_ONLINE"
  },
  "ids:keyStore" : {
    "@id" : "file:///conf/keystore.p12"
  },
  "ids:connectorProxy" : [ {
    "@type" : "ids:Proxy",
    "@id" : "https://w3id.org/idsa/autogen/proxy/548dc73a-ccfb-4039-9569-4b8e219b90bc",
    "ids:proxyAuthentication" : {
      "@type" : "ids:BasicAuthentication",
      "@id" : "https://w3id.org/idsa/autogen/basicAuthentication/47e3cd59-d351-4f5b-99fc-561c94bad5e1"
    },
    "ids:proxyURI" : {
      "@id" : "http://proxy.dortmund.isst.fraunhofer.de:3128"
    },
    "ids:noProxy" : [ {
      "@id" : "https://localhost:8080/"
    }, {
      "@id" : "http://localhost:8080/"
    }, {
      "@id" : "https://localhost:8081/"
    }, {
      "@id" : "http://localhost:8081/"
    } ]
  } ]
}
Configuration Persistence
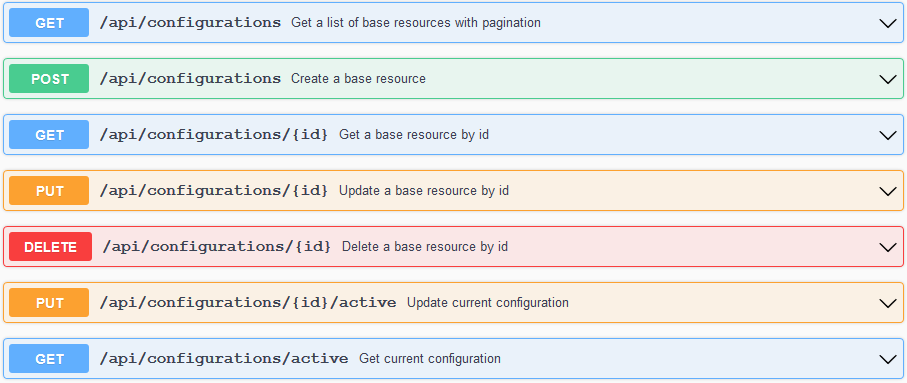
New: Since v6.0.0, the Dataspace Connector offers CRUD endpoints for managing multiple configurations. For a first start, the config.json will be loaded. All settings will then be persisted in the database, so the application does not “forget” them on a restart. On top of that, you can switch between multiple configurations. Just use the corresponding endpoints to see what configuration is active and change it, if wanted.
With this, e.g. the deploy mode can be changed at runtime. On top of that, with v6.1.0, the connector offers the possibility to be set to offline. Only if the connector status is set to online, incoming requests at /api/ids/data will be processed. Otherwise, the requesting connector receives a rejection message:
{
  "reason": {
    "@id": "https://w3id.org/idsa/code/TEMPORARILY_NOT_AVAILABLE",
    "properties": None
  },
  "payload": "This connector is offline. Your messages will not be processed or persisted.",
  "type": "de.fraunhofer.iais.eis.RejectionMessageImpl"
}
Per default, the connector status is set to online.
Note: Since the application has a few technical prerequisites, some of the configuration properties are read-only: the version, the inbound and outbound infomodel versions, the security profile, and the default endpoint. The latter results from the set connector id.
An example configuration could look like this:
{
  "connectorId": "https://localhost:8080",
  "title": "Dataspace Connector",
  "description": "IDS Connector with static example resources hosted by the Fraunhofer ISST",
  "defaultEndpoint": "https://localhost:8080/api/ids/data",
  "version": "6.1.0",
  "curator": "https://www.isst.fraunhofer.de/",
  "maintainer": "https://www.isst.fraunhofer.de/",
  "inboundModelVersion": [
    "4.0.0",
    "4.1.0"
  ],
  "outboundModelVersion": "4.1.0",
  "securityProfile": "Base Security",
  "status": "Online",
  "logLevel": "Warn",
  "deployMode": "Test",
  "proxy": null,
  "trustStore": {
    "location": "file:///conf/truststore.p12",
    "alias": "1"
  },
  "keyStore": {
    "location": "file:///conf/keystore-localhost.p12",
    "alias": "1"
  }
}
Force-load from file
It is now possible to force the reloading of the configuration from the config.json when restarting the Connector. Thus, the configuration marked as active in the database is ignored on start-up. The data from the config.json and the application.properties (truststore/keystore password and alias) are then stored to the connector’s database as new active config and can be changed via the REST API. Every new start of the connector with force reload will trigger the reloading of the config from the config.json. The force reload can be set in the application.properties and is thus needed as an environment variables depending on the setup:
configuration.force.reload=true/false
True will force reloading the config from config.json and application.properties. The default value is set to false.
Note: If a configuration is activated at runtime via the REST API that cannot be processed by the Messaging Services (which then throws a ConfigUpdateException), e.g. because values of the KeyStore or TrustStore settings are null, the system rolls back to the old working configuration and sets this as the active configuration.
Step 2: IDS Certificate
In the provided config.json, the ids:connectorDeployMode is set to idsc:TEST_DEPLOYMENT. This allows to use the keystore-localhost.p12 as an IDS certificate. For testing purpose, the existing cert can be used, as on application start, the IDS Messaging Services will not request a valid DAT from the DAPS and for received messages, the sent DAT will not be checked.
To turn on the DAT checking, you need to set the ids:connectorDeployMode toidsc:PRODUCTIVE_DEPLOYMENT. For issuing a trusted IDS certificate, see here. Add the keystore with the IDS certificate inside to the resources/conf and change the filename at ids:keyStore accordingly. In addition, set the connector id to the connector’s URL (domain name), that uniquely identifies the connector towards e.g. the IDS Metadata Broker:
"ids:connectorDescription" : {
    "@type" : "ids:BaseConnector",
    "@id" : "https://my.ids.connector.com",
Note: The TEST_DEPLOYMENT mode and accepting a demo cert is for testing purposes only! This mode is a security risk and cannot ensure that the connector is talking to a verified IDS participant. Furthermore, messages from the Dataspace Connector without a valid IDS certificate may not be accepted by other Connector implementations and will not be accepted by the IDS Metadata Broker running in the IDS lab and the public available IDS AppStore.
Step 3: General Settings (optional)
The application.properties specifies several Spring Boot and IDS configurations.
Tomcat
To define on which port the connector should be running, change server.port={PORT}.
OpenApi
You can change Swagger properties by changing the following settings:
springdoc.swagger-ui.path=/api/docs
springdoc.swagger-ui.operationsSorter=alpha
springdoc.swagger-ui.tagsSorter=alpha
springdoc.swagger-ui.disable-swagger-default-url=true
springdoc.swagger-ui.doc-expansion= none
springdoc.writer-with-default-pretty-printer=true
SSL
If you want to add your own SSL certificate, check the corresponding path. As the provided certificate only supports the application running at localhost, you may replace this with your IDS keystore, if you want to host the connector in a productive environment.
server.ssl.enabled
server.ssl.key-store-type
server.ssl.key-store
server.ssl.key-store-password
server.ssl.key-alias
configuration.path
configuration.keyStorePassword
configuration.keyAlias
configuration.trustStorePassword
Http Connections
For customizing timeout settings for incoming and outgoing requests, you may customize the following lines:
http.timeout.connect=10000
http.timeout.read=10000
http.timeout.write=10000
http.timeout.call=10000
Not that either the call timeout is used, or the other three values.
Authentication
The application uses Spring Security. Each endpoint behind /**, needs a user authentication, except the open IDS endpoint at /api/ids/data.
Have a look at the blocked endpoints in the ConfigurationAdapter class to add or change endpoints yourself. In case you don’t want to provide authentication for your backend maintenance, feel free to remove the corresponding lines.
For changing the default credentials, the properties are located at
spring.security.user.name
spring.security.user.password
and
spring.security.app.name
spring.security.app.password
Database
The Dataspace Connector uses Spring Data JPA to set up the database and manage interactions with it. Spring Data JPA supports many well-known relational databases out of the box. Thus, the internal H2 can be replaced by e.g. MySQL, PostgreSQL, or Oracle databases with minimal effort.
To use another database for the Dataspace Connector, follow these steps.
Settings are provided within the application.properties at:
spring.datasource.url
spring.datasource.driverClassName
spring.datasource.username
spring.datasource.password

spring.h2.console.enabled=false
spring.h2.console.path=/database
spring.h2.console.settings.web-allow-others=true
By default, the Dataspace Connector is running with an H2 database that is non persistent. On every start-up, it thus will be empty again. To change this behaviour, define a file location in the application.properties.
spring.datasource.url=jdbc:h2:file:./target/db/resources
Logging
The Dataspace Connector provides multiple ways for logging and accessing information. Please find a detailed description on how to set up static and runtime configurations here.
Settings are provided within the application.properties at:
management.endpoints.enabled-by-default=false
management.endpoints.web.exposure.include=logfile, loggers
management.endpoint.loggers.enabled=true
management.endpoint.logfile.enabled=true
management.endpoint.logfile.external-file=./log/dataspaceconnector.log
Http tracing is disabled by default: httptrace.enabled=false.
OpenTelemetry with Jaeger
If you want to access telemetry collected via OpenTelemetry, have a look at this guide. You can enable the telemetry export to Jaeger by adding your Jaeger endpoint for telemetry collection:
opentelemetry.jaeger.endpoint=
This feature is disabled by default without a Jaeger endpoint in the settings.
Bootstrapping
If you want to change the base path, which will be used to find properties and catalogs for bootstrapping, you can customize the following line:
bootstrap.path=./src/resources
bootstrap.enabled=false
Bootstrapping is disabled by default: bootstrap.enabled=false.
IDS Settings
URLs of the DAPS for IDS identity management and the Clearing House for contract agreement and data usage logging can be changed within the following lines:
daps.url=https://daps.aisec.fraunhofer.de
daps.token.url=https://daps.aisec.fraunhofer.de/v2/token
daps.key.url=https://daps.aisec.fraunhofer.de/v2/.well-known/jwks.json
daps.key.url.kid={'https://daps.aisec.fraunhofer.de/v2/.well-known/jwks.json':'default'}
clearing.house.url=https://ch-ids.aisec.fraunhofer.de/logs/messages/
If you leave the Clearing House address blank, the connector will ignore sending IDS messages to it.
In addition, it is possible to configure which DAPS should be trusted. Multiple DAPS-URLs can be specified in the form of a comma-separated list. The entry can also be left blank. If messages with DAT issued by DAPS arrive that are not on the list of trusted DAPS, they are automatically rejected by the Connector. The list can also be managed at Connector runtime using the DAPS entity APIs. In case of an empty list, all DAPS are trusted.
daps.whitelisted.url=https://daps.aisec.fraunhofer.de
Also, for usage control, some settings are provided:
policy.negotiation=true
policy.allow-unsupported-patterns=false
policy.framework=INTERNAL
Contract negotiation is enabled by default. This forces other Connectors to refer to a valid contract agreement when requesting data access via an ArtifactRequestMessage. If you want to deactivate the policy negotiation, as data provider or data consumer, use the following endpoints or the corresponding line within the application.properties.

Note: The Dataspace Connector is able to received resources with usage policies that follow the IDS policy language but not one of the supported patterns. As, by default, the policy check on the data consumer side would not allow accessing data whose policies cannot be enforced, you are able to ignore unsupported patterns with setting the boolean at the endpoint /api/configuration/pattern or the property policy.allow-unsupported-patterns in the application.properties to true. As a data consumer, you are bound to concluded contract agreements that are technically mapped to IDS usage policies. Therefore, you have to ensure, that your backend applications technically enforce the usage policies instead.

The IDS Messaging Services dependency comes with some further settings. For example, you can specify what DAPS you want to connect to and whether incoming messages should be, in addition, processed by a SHACL validator.
daps.mode=aisec
shacl.validation=true
Note: For more configurations, see here.
IDSCP2 Usage and Remote Attestation
As the IDS Messaging Services provide the connector with the ability to communicate via IDS multipart messages, the IDSCP2 dependency allows to send and receive the same messages via the IDSCP2 protocol. For this and the underlying Apache Camel framework, some more settings need to be set and can be modified accordingly:
## IDSCP2
idscp2.enabled=false
idscp2.keystore=./src/main/resources/conf/cert.p12
idscp2.truststore=./src/main/resources/conf/truststore.p12

## IDSCP2 CMC RA
## Expected and featured RA suites of server/client routes in the DSC
idscp2.supported-ra-suites-server=Dummy|CMC
idscp2.expected-ra-suites-server=Dummy
idscp2.supported-ra-suites-client=Dummy|CMC
idscp2.expected-ra-suites-client=CMC
## Set this to the IP address or hostname the machine/container running the cmcd
idscp2.cmc-host=172.22.0.1
Setting idscp2.enabled to true will activate IDSCP2 support, using the default port 29292 as IDSCP2 server port.
The idscp2.[keystore/truststore] properties define paths to the keystore and truststore in use. The provided example keystore (cert.p12) is issued for hostname consumer-core, which has to be set in docker-compose.yml, or elsewhere, accordingly.
Modifications to support remote attestation are only provided with DSC v7.0.1-ra!
The idscp2.[supported/expected]-ra-suites-[client/server] properties specify the supported and expected remote attestation mechanisms for client and server, respectively. The default configuration specifies both the “Dummy” remote “attestation” (which does nothing), and the remote attestation using the Container Measurement Component (CMC), whereas the client expects the server to supply CMC RA, and the server does not request RA from the client. If you want to use remote attestation via the CMC, please consult the README in the CMC Repo for setup directions.
In order for the IDSCP2 RA adapter to communicate with the CMC, the host (and optionally port) of the CMC server has to be specified via the idscp2.cmc-host property. This can be a little tricky in containerized environments, the example specifies a typical host IP address in a Docker (Compose) network, but should NOT be expected to work out of the box! Please use docker inspect or similar to check the actual subnet and modify the property accordingly! Another port but the default port 9955 can optionally be specified using the format <host/ip>:<port>.