Deployment
This section is currently being edited. In the future, this section will include guidance on deploying the IDS App Store.
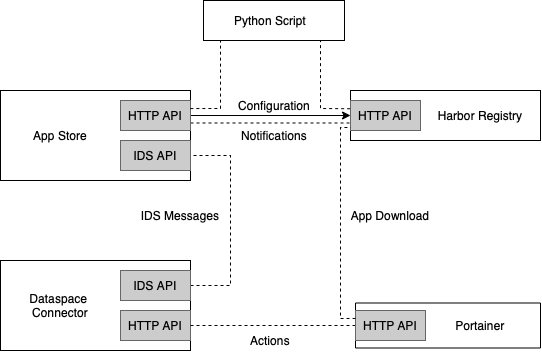
There are four main components needed to make the entire App Store environment running, starting from uploading an app to the App Store to downloading an app from the Connector.
Those main components are as follows:
- Harbor Registry: For uploading and downloading app images using Docker protocol
- App Store: Managing metadata about Data Apps
- Connector: Search/Download app metadata from App Store, download/run/configure app containers
- Portainer: Management of Docker containers on client side (connector)
The connections between the above components are shown in the following figure:

It follows instructions on how to install each component.
Installation and Running of the Harbor Registry
Make sure that your Harbor Registry installation is on a machine with a domain name (e.g., srv.registry.de), not on localhost. The full tutorial can be found under the following link: https://goharbor.io/docs/2.5.0/install-config/
Docker and Docker-compose are also required for Harbor Registry deployment. To install Docker, you can use this link. To install Docker-compose, you can use this link.
-
Download: Download the latest Harbor release from the following website: https://github.com/goharbor/harbor/releases (currently version 2.5.0)
-
Extract: Extract the downloaded file:
sudo tar xvf harbor-offline-installer-version.tgz. If there is an old installation, remove the old harbor data folders:rm -r /data/database rm -r /data/registry -
Configure HTTPS Access to Harbor: A valid SSL certificate is required to enable https on the registry server. An SSL certificate can be created by any certificate authority on the Internet. Alternatively, you can contact your company’s network administrator. Usually you have two files: (1) a certificate (e.g.,
cert.pem), (2) a private key (e.g.,key.pem). -
Configure the Harbor yml file: Edit
harbor.yml.tmpland rename it toharbor.yml. The parameters take effect when you run theinstall.shscript to install or reconfigure Harbor. The following information must be edited in the file:
– Change thehostnameto the domain name of your harbor registry.
– Specify the location of your server certificatecert.pemand your private keykey.pem.
You can see below the corresponding section of the harbor.yml file.
hostname: reg.mydomain.com #change to your harbor registry domain name,
e.g., srv.registry.de
http:
  # port for http, default is 80. If https enabled, this port will redirect to https port
  port: 80
https:
  # https port for harbor, default is 443
  port: 443
  # The path of cert and key files for nginx
  certificate: /your/certificate/path # give your certificate path, e.g.,
  /data/harborkeys/cert.pem
  private_key: /your/private/key/path # give your key path, e.g.,
  /data/harborkeys/key.pem
- Run the installer script: Run the following commands:
sudo ./prepare sudo ./install.sh - Access the harbor registry server with HTTPS: You can access your server at
https://yourHarborRegistryDomainName, which ishttps://srv.registry.dein the example given in this documentation. In this configuration, we assume that you are running the server with the default443. If you are using a different port number, you can access it at the template URLhttps://yourHarborRegistryDomainName:yourPortNumber. Make sure that you allow access to your server from outside if it is running behind a firewall or proxy server.
Installation and Running of the App Store
Prerequisites: To use all the features of the IDS App Store, the IDS App Store must be deployed on a separate server with HTTPS enabled. The deployment steps are covered in the section Configuration of App Store.
The App Store can be installed from the following GitHub repository: https://github.com/International-Data-Spaces-Association/IDS-AppStore
It follows instructions on how to install and run the App Store:
Ensure that at least Java 11 is installed. To build and run the IDS App Store locally, follow these steps:
- Clone this repository:
git clone https://github.com/International-Data-Spaces-Association/IDS-AppStore.git - Create /data/search folder on the root with
cd /andmkdir -p /data/search. If required, change the directory in src/main/resources/application.properties:spring.jpa.properties.hibernate.search.backend.directory.root = /data/search. - Execute
cd IDS-AppStore,chmod +x mvnwand./mvnw clean package -DskipTests -Dmaven.javadoc.skip=true. - Navigate to
/targetand runsudo java -jar appstore-{VERSION}.jar.
If everything worked fine, the application is available at https://localhost:8080/. The API can be accessed at https://localhost:8080/api. The Swagger UI can be found at https://localhost:8080/api/docs.
For certain endpoints, you will be asked to log in. The default credentials are admin and password. Please take care to change these when deploying and hosting the App Store yourself.
As a specialization of the Dataspace Connector, the App Store must be configured in the same way as the Connector. This means, the IDS certificate must be configured for the App Store in the same way as for the Dataspace Connector. The configuration of the IDS certificate is explained here.
Installation and Running of the Connector and Portainer:
Instructions on how to install the Dataspace Connector can be found at the following link: https://github.com/International-Data-Spaces-Association/DataspaceConnector.
If both the Connector and the App Store are installed on the same machine, the running port must be changed in the src/main/resources/application.properties file. 8080 must be replaced with the number you choose, e.g., 8085.
Portainer can be installed via the following link: https://docs.portainer.io/v/ce-2.6/start/install/server/docker. Also, you can use the following two commands to run portainer, if you are using a Linux-based OS:
docker volume create portainer_data
docker run -d -p 8000:8000 -p 9000:9000 --name portainer --restart=always -v /var/run/docker.sock:/var/run/docker.sock -v portainer_data:/data portainer/portainer-ce:2.6.2
The Connector is configured to connect to Portainer on port 9000, e.g., http://localhost:9000